
We understand that the burden of picking your next measurement microphone; maybe you have started a new project, or your current microphones need replacing… Or maybe you’re getting your first ever set of microphones?
Whatever the reason, let’s just say that trawling through endless datasheets, tables, graphs and charts isn’t the ideal way to spend your time…
But choosing the right microphone doesn’t need to be complicated or stressful, run through this simple step by step guide to make sure that you’re picking the best measurement microphone for your application.
Contents Page
- Knowing Your Sound Field
- Chose Your Polarisation Type
- Matching the Frequency Range
- Understanding Dynamic Range
- Choosing your Sensitivity
- Considering the Build Quality
- Purchasing
- BONUS TIP – Using a Selection Tool
- Check Out a Range of Different Microphones
Step 1 – Knowing Your Sound Field
The first step is knowing the kind of sound environment you’ll be operating in. You have 2 options really. Free Field or Pressure Field. But what’s the difference?
Free – Field Microphones
Ideal for open environments without reflections (like outdoors or in anechoic chambers). The measurement microphone compensates for its own presence in the sound field.
These are often best suited for use in sound level meters, sound power testing and general SPL measurements.
Pressure – Field Microphones
Designed for enclosed or boundary environments — they measure the sound pressure directly on the diaphragm.
Pressure field microphones are more suited for couplers, ducts, ear simulators, or measuring close to walls.
So, you’ve chosen your sound field type… Check! Next up is your polarisation type.
Step 2: Choose Your Polarisation Type
First of all, what is polarisation?
In short, it’s how a microphone is powered internally to detect sound properly.
Inside a condenser microphone, there’s a super-thin piece (like plastic wrap) that moves when sound hits it. That movement needs to be turned into an electrical signal — and to do that, the mic needs a little electric charge.
That’s what polarization means: giving the microphone that small electric charge so it can “listen.”
There are two types — both are condenser mics, but they differ in how they’re powered.
Externally Polarised Measurement Microphones
Requires a 200V power supply and works with traditional 7-pin LEMO setups.
These would be best used where you need extremely high accuracy measurements and very stable long-term use.
Pre polarised (CCP)
Powered via constant current through standard coaxial cables (BNC).
Pre polarised microphones are suitable for most applications and are much more rugged and cost effective.
When picking between the 2, most of the time, this will be a pre polarised microphone, but it’s always good to check. Now we need to choose the frequency range.
Step 3: Match the Frequency Range
Now you need to make sure that the measurement microphone you’re choosing can handle the full range of frequencies you’re interested in measuring.
You have a range of frequencies to choose from so it’s not a case of this or that. But a good place to look would be a measurement guide, that way you can see clearly the range of frequencies and microphones offered.
A great example of one is here – you can adjust the slider to suit your needs, and cut out the microphones that wouldn’t work for you.
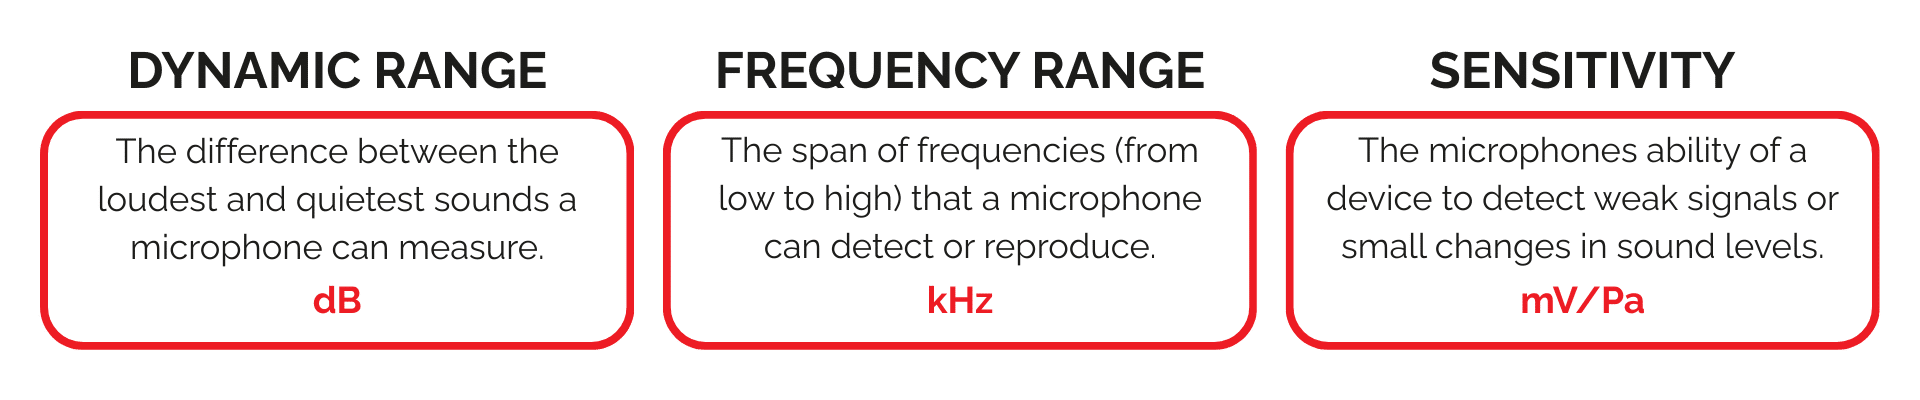
Step 4: Understand the Dynamic Range of Your Measurement Microphone
Dynamic range is a similar story to frequency range. You need your microphone to be able to withstand the level of noise you’re dealing with.
Essentially, you want a mic that won’t distort at high levels — but also doesn’t drown out quieter sounds with self-noise.
Again, this isn’t a case of low or high as every measurement microphone has a different range – its best to look back at that handy selection guide to pick the dynamic range. With that guide you can combine parameters to really narrow down the microphone that’s best suited to your needs.
Step 5: Sensitivity — Know What You’re Getting Out
Sensitivity tells you how well a microphone picks up quiet sounds. It’s a measure of how strong the signal is when the mic hears a sound. This is usually displayed in mV/Pa (millivolts per pascal)
Think of it like this: Imagine two microphones in the same room. One hears you whisper and sends out a strong signal — that’s a high-sensitivity mic. The other hears the same whisper but gives a weaker signal — that’s lower sensitivity.
To put it simply
Higher number = more sensitive
Lower number = less sensitive
A higher sensitivity isn’t always good though, as at louder sounds the higher sensitivity measurement microphones tend to warp and become damaged.
Sensitivity is another parameter that has many options, it is best to consider the kind of sound you’re measuring and then work out what kind of sensitivity you need based on that. For example.
High sensitivity = Great for quiet environments but may distort at high SPLs. Such as environmental noise, office studies, product noise etc.
Low sensitivity = Handles louder levels better, but not ideal for low noise measurements. These are best suited to construction monitoring, industrial noise, firearms or explosive measurement and NVH.
Step 6: Consider the Build Quality of Your Measurement Microphone
If you’re working in challenging environments, material matters. A lot of microphones are made from lighter, cheaper materials so it’s important to know who you’re buying from.
Titanium microphones are available and are more cost effective, we’d recommend Crysound Microphones. as they can survive harsher environments than most of the market and they cost less!
Step 7: Get to purchasing!
Congrats, you’ve just gone through everything you need to consider when picking up some new measurement microphones That wasn’t so bad, was it?
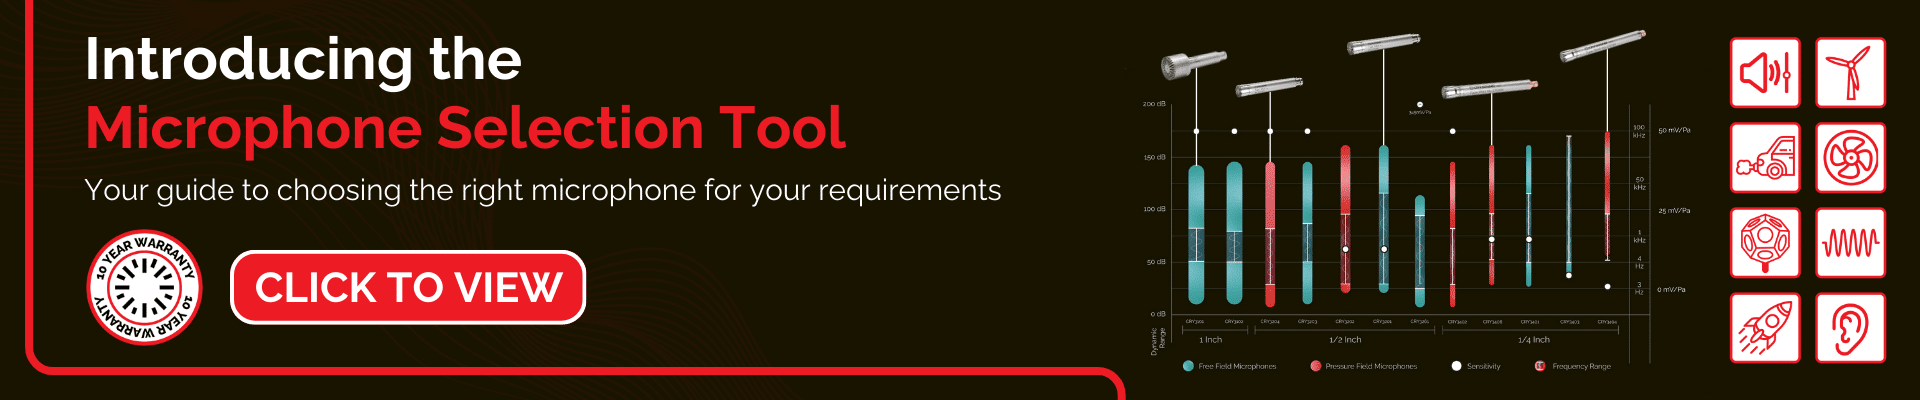
Bonus Tip – Use a Microphone Selection Guide
Now all these tips and information is great, but that doesn’t stop you from having to do all the hard work looking through boring graphs and charts and dreaded datasheets *shudders*
Unless there was a solution (there is). You can just use an interactive selection guide that will essentially do all the hard work for you. All you need to do is move the sliders to your parameters and it will show you the best microphone for your needs.
Unsure what parameters you need? No worries, simply choose from a list of application presets and get a tailored list of microphones chosen for you.
So, lets quickly run through the checklist again?
- What environment are you measuring in (free-field or pressure)?
- Do you need pre polarised (CCP) or externally polarised?
- Is the frequency range wide enough for your needs?
- Can the mic handle the sound pressure levels you expect?
- Does the sensitivity match your application?
- Are you working in a harsh environment (e.g. heat, vibration, corrosion)?
- Have you tried the Microphone Selection Tool?
Check Out Our Range of Measurement Microphones
Want to see which microphones are best for you? Check out our range of measurement microphones, including our Crysound range.
Crysound microphones are all titanium built, meaning you get the most durable and rugged microphones on the market. They also all come with a 10 year, no quibble warranty, so if something does go wrong, you don’t have to worry as we’ll get a new one shipped out to you the very next day. Oh and also, you can pick them up at the most competitive prices on the market.


.28.png)