
Anyone who’s interested in measuring the performance of headsets, smart devices, telephones, earbuds and the like should be familiar with the need for a mouth simulator. This is a kind of ‘standardised’ loudspeaker, which emulates the frequency and dispersion characteristics of the human, and is also often found built-in to head and torso simulators.
A standalone mouth simulator will be designed to meet the requirements of ITU-T Recommendation P.51, covering radiation characteristics at 17 points in the near and far field, distortion, dynamic range, acoustic impedance, etc. and you can download a copy here if you have trouble sleeping.
By the way, they’re not called artificial voices any more.
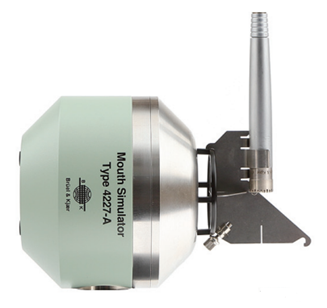
An early influencer/adopter was Bruel & Kjaer with their Type 4227, of which many hundreds, possibly thousands, have been shipped, and as the analysis systems of the time (early 90’s) were mostly analog, it featured the possibility of monitoring and correcting the output using a near field ¼” pressure microphone in the mouth cavity, using a live compressor loop.
The near-field response (after all, measurements on telephones and headset microphones are done in the near field) is measured at the Mouth Reference Point (MRP) which is 25mm from the front of the mouth on the centreline. The 4227 has a test jig to mount a ½” pressure microphone for this purpose. The response is measured over the range 100-8,000 Hz, and this is used to correct the output of the driving amplifier so the output is flat and calibrated in dB re. Pa. You can then be sure that what you are measuring is the response of the DUT, not the mouth simulator.
Later came the 44AA from GRAS, which, apart from the colour, looks remarkably similar! I guess if someone’s already done the acoustic work on the dispersion, why go to the effort? The most obvious difference is the built-in power amplifier, and a different (but compatible) calibration jig for mounting a ¼” microphone. No allowance is made for having a live reference microphone, as, by this time, digital systems were being used to equalise the mouth output in software.
Looking more closely reveals the 44AA has a more complex mouth cavity, featuring a diffractor inside the opening, which can be adjusted to influence response and sensitivity. It’s not clear why this was felt necessary, but it might just have been a desire to be different! The 44AA can be used passively also, (or you can buy a 44AB) and B&K later introduced an updated Type 4227A which has a power amplifier inside.
The new kid on the block, Crysound, also introduced their CRY609 mouth simulator, which again, looks remarkably like the other two, and probably is a clone of the Type 4227.
All three of these simulators found themselves on my test bench recently, so I thought I’d run a few tests and compare their performance. I’m particularly interested to see how they perform up to 20kHz and how easy it is to equalise them up to that frequency. It’s not a requirement of ITU-T, but everyone these days is talking about wider bandwidths, and riding the HiRes audio bandwagon.
This could be an issue for a mouth simulator which is basically a single 80-90mm loudspeaker boxed up in a metal container.
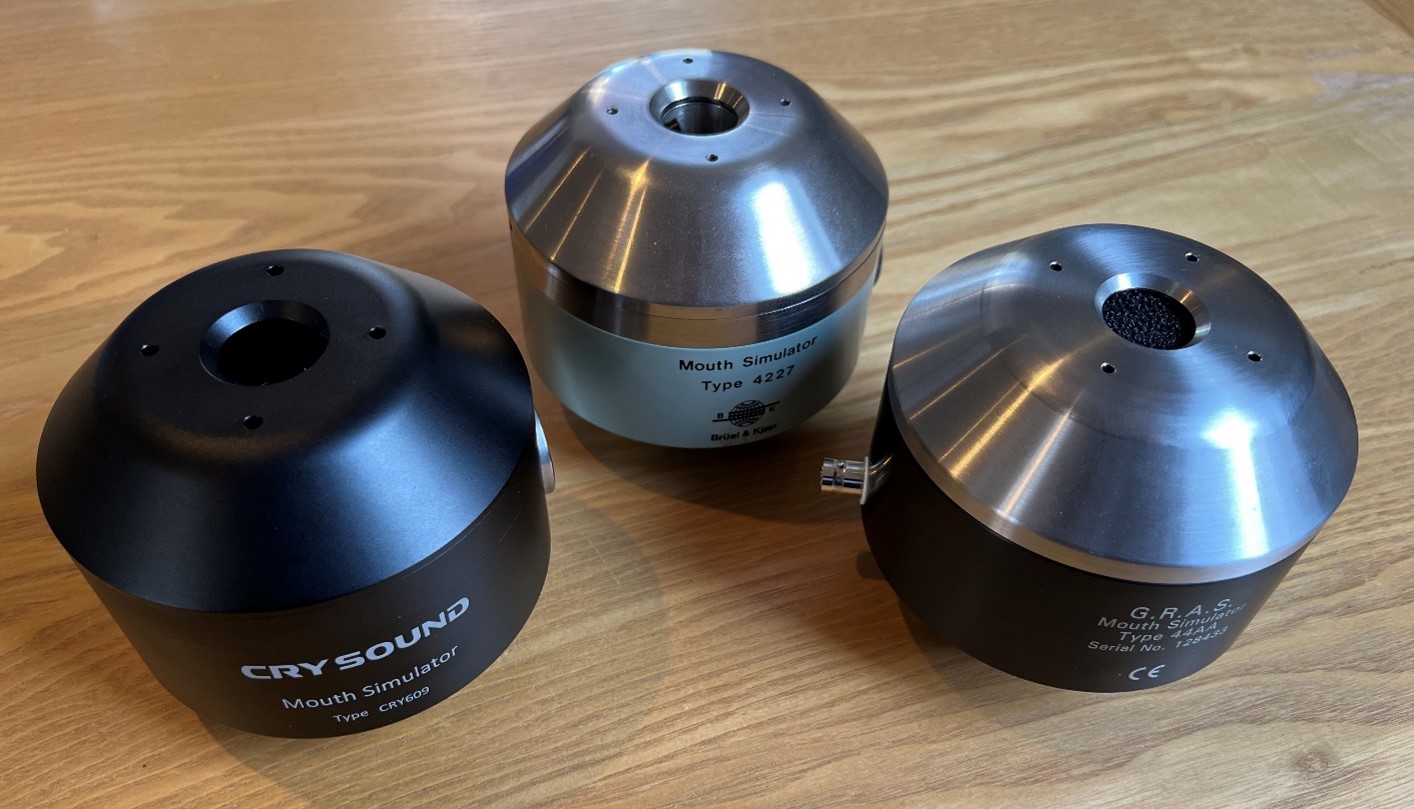
Figure 1: Three mouth simulators looking remarkably similar!
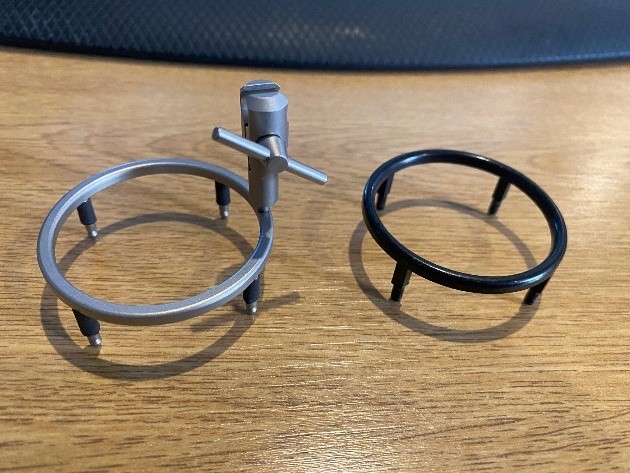
I fired up my trusty Listen SoundCheck installation, and set it up to measure the frequency response and distortion of the simulators at the MRP. To enable comparison, I used the GRAS calibration jig, and a ¼” pressure microphone on all three, whilst acknowledging that the B&K jig normally uses a ½” microphone.
The GRAS jig is shown here against the B&K lip ring, so calibration is performed with minimal acoustic interference. I felt that the B&K jig might have more of an influence at high frequencies than is desirable.
Note also that the 4227 is supplied with a dummy microphone, which fits into the mouth cavity to compensate for the lack of live reference microphone, which is pretty much obsolete these days.
All the simulators were measured from 100Hz to 20kHz, for a 1V RMS input, and the distortion measured for a level of 94dB re. 20uPa @ 1kHz
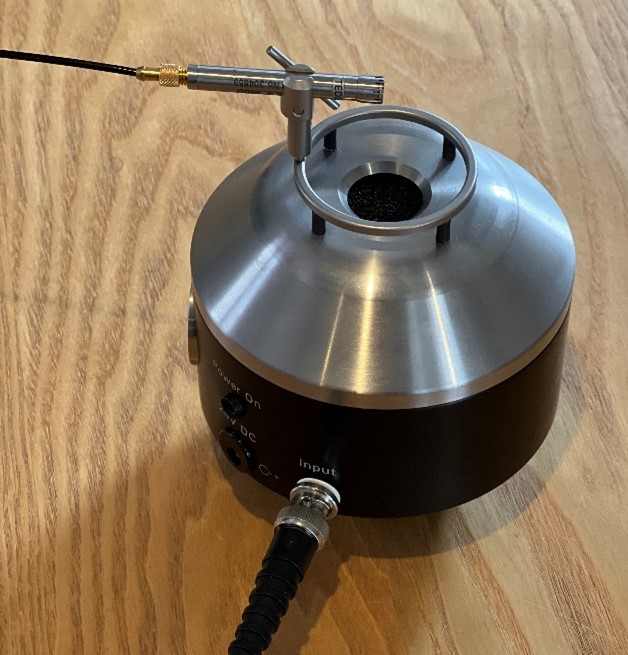
This photo shows the location of the reference microphone at the MRP.
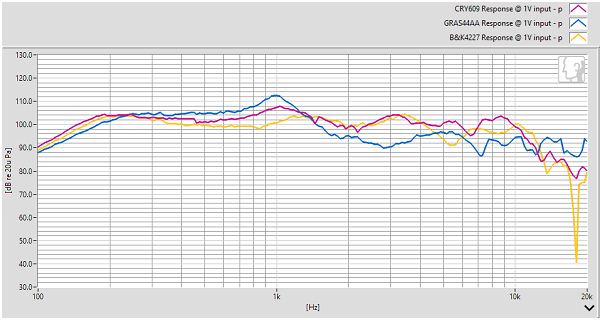
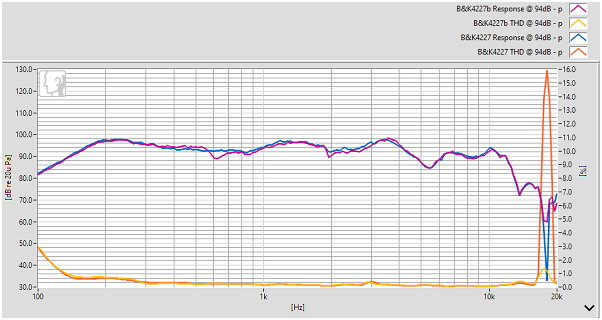
Here’s a graph of the three frequency responses at 1V input. The first thing to note is that the 44AA is more sensitive than the B&K at 1kHz by about 12dB (!), but the response is not so even. I suspect the sensitivity comes from the waveguide in the mouth cavity, as the sensitivities are similar at lower frequencies. Also, it looks like the GRAS has a slightly higher fundamental frequency than the two others. The Crysound and B&K responses are very similar, and much more even.

The THD curves show generally good performance, well within the P.51 tolerance. These were measured with the output of the simulators adjusted to 94dB @ 1kHz. The Crysound is best, showing a significantly better behaved distortion characteristic. There is a problem with the B&K though, as there is a drop out in the response at 18kHz, and as THD is generally a percentage of the response, this gives a big peak in the THD. This is a good argument for using the Normalised THD function in SoundCheck!
I thought I’d explore the reason for this peak, and I wondered if it had anything to do with the presence of the dummy microphone in the mouth cavity. The ½” wavelength at 18kHz is around 9mm, so it’s possibly a near field effect.
Sure enough, removing the dummy microphone removes some the drop out, and as a result the THD drops to sensible levels, less than 1.5% @ 94dB @ 18kHz. I’m not sure if the simulator should be used in this condition, as the dummy microphone is there for a reason, but if you are planning wideband measurements up to 20kHz, you might want to bear that in mind. It also makes it easier to equalise the response at high frequencies.
It may also be due to the fact that B&K use a different calibration adapter, which has much more metalwork, and this will cause its own influence (as seen in this picture from the B&K website).
The jig consists of two clip-together plates, which hook into the lipring, with a spring clip for the microphone. This shows the orientation for a pressure microphone.
When the mouth simulators are used in anger, they are normally equalised such that their output is independent of desired level in pascals. The equalisation process is simply carried out by SoundCheck as part of its calibration routines. The desired frequency range is selected (this time going up to 20kHz, instead of the ‘normal’ 8kHz in ITU-T P.51), and first the constant voltage response is measured. This response is then inverted, and applied to the input voltage, theoretically flattening out the response. Normally, due to non-linearities in the loudspeakers, the process is iterated until an acceptable equalisation is used.
The simulators were equalised at 80dB output, and then checked.

The B&K seemed to be less stable when calibrating, perhaps due to the irregularities at high frequencies, but generally, tolerances can be kept to +/-0.2dB.
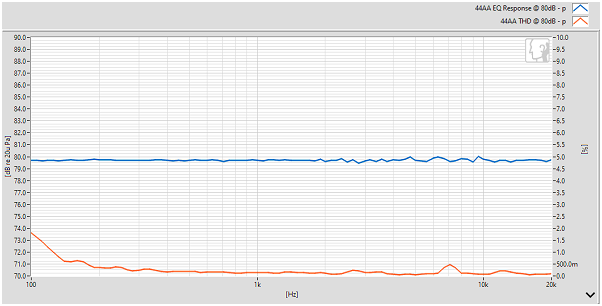
The GRAS was better behaved, and equalised quite quickly with a couple of iterations. It’s worthy mentioning that it can be easier to equalise a more uneven response as the equalisation routine has more to get its teeth into, but that does assume good linearity. Note the lack of THD peak at high frequencies due to the extended response of the speaker. There is a lump at around 7kHz in the THD, which will be due to the lower unequalised response over that range.
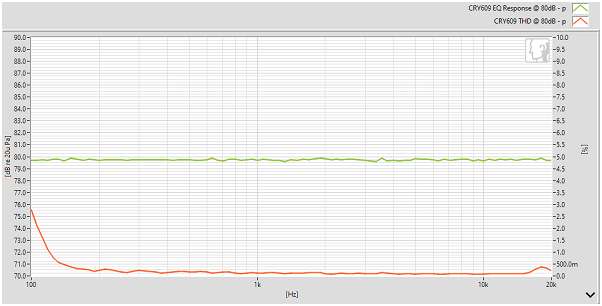
The Crysound was easiest of all, and shows lower distortion of the three units, with a controlled response at high frequencies.
So, there you have it. Three different mouth simulators, built to the same standard, and performing as one might expect over the ‘normal’ frequency range up to 8000Hz. All three can be used for equalised measurements up to 20kHz, but beware that some inconsistencies in the response of the B&K4227 towards the top end could cause you equalisation and distortion issues.
I’m uncertain as to the best calibration jig to use. I suppose if you have a 4227, then you’ll follow the manual and calibrate as recommended. However, I’m concerned that the calibration jig is less than ideal for high frequencies. It makes more sense to me to use a ¼” microphone with more skeletal hardware.
Note that all the simulators were used in passive mode, so no measurements were taken with internal power amplifiers switched on.